
Making a Bluetooth Numpad. Part 2: Software
09 Nov 2017This is part two of the build log. Now we turn to the software, which are gonna make this thing act as a numpad when connected to a computer. The code that runs the numpad can be found at this repo.

Configuring the Arduino IDE
To load the software onto the Adafruit Feather 32u4, you’ll need the Arduino IDE. Out of the box the IDE does not support the Feather, so follow the setup guide to install the Adafruit board manager.
After you’ve installed everything, you can test the board with some of the example scripts to check that the board is working.
Simple Numpad Scanner Script
I implemented my own matrix scanner. First, to get a deeper understanding of how the matrix works, but I ended up later converting it to a library, that the main sketch utilizes to scan the numpad.
The scanner code was shown in the previous post (and can be found on GitHub, here). Note that I mixed up row and column. For instance, the activateOneRow should have been called activateOneCol. This mix-up was fixed in the library code, so please look at that if this code is confusing.
The code snippet has been left there to illustrate how I progressed from an empty sketch to a working HID numpad.
Converting a Script to a Library
Putting all the numpad code, in addition to the Bluetooth and USB code in one sketch would quickly turn messy and unmanageable. However, I had no prior experience with C and C++, so writing the library was challenging. I used this Arduino guide as a reference to write it.
I’ve mostly spent my time in languages such as JavaScript, Python and C#, so writing C++ was interesting. Below is a list of issues I had. I spent quite a bit of time on some of them.
- Pointers.
- Returning arrays from a method was not that straightforward, because of the point above.
- Memory management felt a bit foreign.
- Worrying about running out of memory.
- Serial object not initialized before
setup(), so calling print does not work, and using Serial to determine if board is connected to USB did not work.
However, I did create a library of some sort. If you want to use it, remember to put it into the /Documents/Arduino/libraries folder to use it in the Arduino IDE. In the section below, you can find a tip related to that.
Below I’ll quickly explain the public methods:
- scan() - Scans matrix and records pressed keys.
- getPressedKeys(int i) - Returns one of the pressed hexadecimal integer key code.
- getNumberPressed() - Number of keys that have been pressed.
The methods above are defined in the Numpad.h header file. The header file also defines a matrix of hexadecimal integers that represent HID key codes. A table of all available USB HID codes can be found here.
I also tried implementing some sort of delay between the first and second character press, but here I failed. Instead, when you press and hold, only one character is sent. You will have to release and press again to send another character to your computer. This alternative approach works well enough for a numpad.
Symbolic Links
Arduino unfortunately likes to have all its libraries in /Documents/Arduino/libraries. This is a bit inconvenient when developing a library. In the beginning I did a copy and paste of the library from the code base into the libraries folder, whenever I did a code change. Did not take long before I got tired of doing that, and found a better way.
The solution is to create a symbolic link. Arduino will then always use the up to date library code from the code base.
How to creating a symbolic link:
- Open cmd.exe in administrator mode.
- Create a symbolic link by:
mklink /D "C:\Users\equalpasta\Documents\Arduino\libraries\Numpad" "C:\Users\equalpasta\Documents\git\arduino-bluetooth-numpad\Numpad"
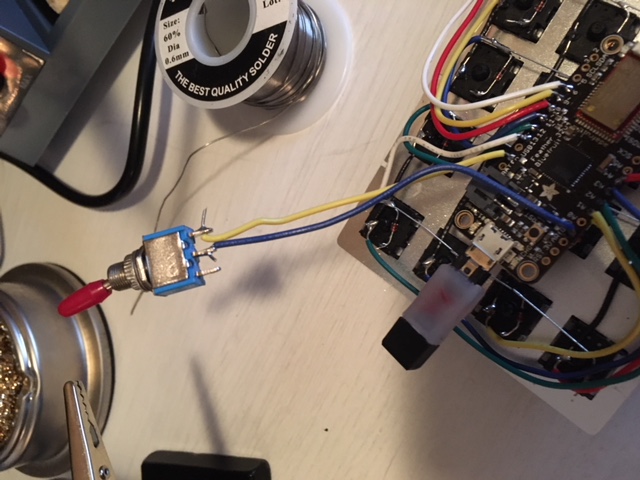
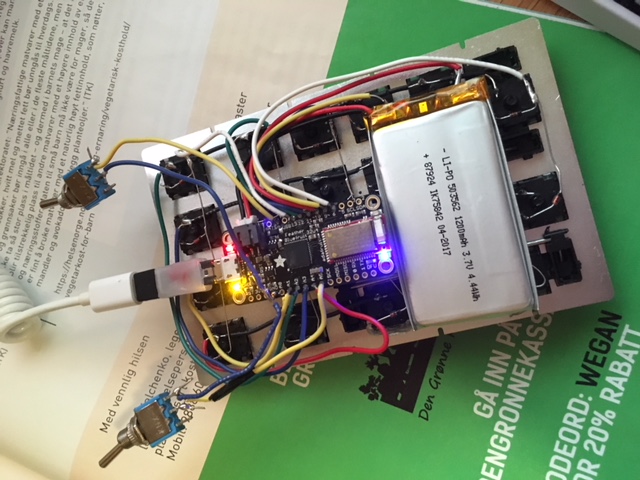
Power Switch and Battery
Since I will connect a battery to the board, I soldered on an on/off switch. This is done by connecting the ENABLE pin to GROUND through a switch. If the circuit is closed, the device does not operate. See here for more information.
Bluetooth and USB Connectivity
The HID keycodes are either sent over Bluetooth or USB.
Bluetooth
- Utilized example code that can be found on the board’s website. The HIDKeyboard example shows how to set up the board as a HID device, set the broadcast name, and how to send key codes.
- I created a small wrapper for the Bluetooth code.
- Basically, you use
ble.printto send AT+BLEKEYBOARDCODE=00-00-00-00-00-00-00-00 commands. The latter 6 groups of number specify up to 6 simultaneous key presses. - After each of these you need to “release” the keys by sending an additional AT+BLEKEYBOARDCODE=00-00 command.
USB
- As specified in the Arduino reference, 32u4 based boards can become a HID device. It also mentions NicoHood’s HID library that implements different HID devices.
- I used the Improved Keyboard HID library.
- Add
Keyboard.begin()at the top. Sending codes are done by:Keyboard.write(KeyboardKeycode(numpad.getPressedKeys(i)));. getPressedKeys returns hexadecimal integers.
An Additional Switch for Bluetooth/USB
Originally, I planned to switch between Bluetooth and USB connectivity based on whether the USB/Serial was connected. This turned out to not be as easy as I thought:
- Checking if Serial is initialized or not can work. Unfortunately, this check cannot be done in setup since Serial is not necessarily instantiated before setup is run.
- No easy way to detect USB/Serial disconnect event.
- You might want to charge board, while sending keystrokes over Bluetooth. So, you need to determine that the board is connected to a computer.
Basically, I ended up soldering on an additional switch, that controls how the numpad sends pressed keys. In each iteration of the loop method, switch is checked and the pressed keys are either sent over Bluetooth or USB:
int pressed = numpad.getNumberPressed();
  if (pressed > 0) {

    int mode = digitalRead(CONNECTIVITY_MODE);
    if (mode == BLUETOOTH_MODE) {
      sendKeysBLE(pressed);
      blueBoard.resetKeys();
    }
    else {
      sendKeysUSB(pressed);
    }
  }
That’s it! And here is a video of the numpad working as a USB HID device.
All that remains is to get some nice keycaps and create a pretty enclosure. That will happen in the next post!